 Save to Pinterest
 My mom called me on a random Tuesday asking if I could bring dinner to her place, and without thinking, I promised honey garlic chicken thighs. I'd never made them before, but something about that combination of sweet and savory felt like it couldn't miss. Three hours later, the kitchen smelled like caramelized garlic and the chicken skin was the color of burnished gold, and I realized I'd stumbled onto something that would become a regular rotation in my weeknight cooking. The best part was watching everyone at the table slow down mid-conversation just to appreciate how tender and juicy those thighs were.
I made this for a small dinner party once, and a friend who usually picks at her food asked for seconds before I'd even cleared the first course. She claimed it was the best chicken she'd had in months, and honestly, I think it was because the meat was so tender it practically fell off the bone. There's something about bone-in, skin-on thighs that just refuses to dry out, even under the broiler.
Ingredients
- Bone-in, skin-on chicken thighs: They're more forgiving than breasts and pack so much flavor; the skin crisps up beautifully if you start skin-side up and don't move them around too much.
- Honey: Buy the decent stuff if you can, because it's doing real work here as both sweetener and glaze builder; cheap honey sometimes tastes thin and won't caramelize the same way.
- Soy sauce: This is your umami anchor, so don't skip it or substitute with something light; it balances the honey and keeps everything from tasting one-dimensional.
- Garlic: Mince it fresh and don't be shy; four cloves might sound like a lot until you taste how mellow it becomes after thirty minutes in the oven.
- Apple cider vinegar: This cuts through the sweetness and adds a subtle tang that keeps your mouth wanting another bite instead of feeling sticky.
- Smoked paprika: It gives depth without heat and a hint of color that makes the finished dish look restaurant-quality.
- Olive oil: Just enough to help everything emulsify into a proper glaze rather than separating while it bakes.
Tired of Takeout? 🥡
Get 10 meals you can make faster than delivery arrives. Seriously.
One email. No spam. Unsubscribe anytime.
Instructions
- Prep your workspace and heat the oven:
- Line a baking dish or ovenproof skillet with foil because you'll thank yourself when cleanup is literally just peeling it away. Get your oven to 400°F and let it preheat while you work on the chicken.
- Dry and season the chicken:
- Pat those thighs really dry with paper towels, because any moisture hanging around will steam the skin instead of crisping it. A light sprinkle of salt and pepper on both sides is all you need right now.
- Arrange with intention:
- Place the thighs skin-side up with a little breathing room between each piece so the heat can circulate. Crowding them turns them into a steaming pile instead of individually golden beauties.
- Build your glaze:
- Whisk honey, soy sauce, minced garlic, vinegar, olive oil, smoked paprika, and chili flakes together in a bowl until it looks uniform and glossy. Taste a tiny dab on your finger, and if it makes you smile, you're ready to go.
- Coat generously and bake:
- Pour that glaze over the chicken and brush it around to make sure every piece gets coated, especially the skin. Slide it into the oven for 30 to 35 minutes, and about halfway through, pull it out and baste everything with the accumulated sauce using a brush or spoon.
- Check for doneness and optional finishing touch:
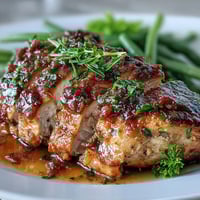
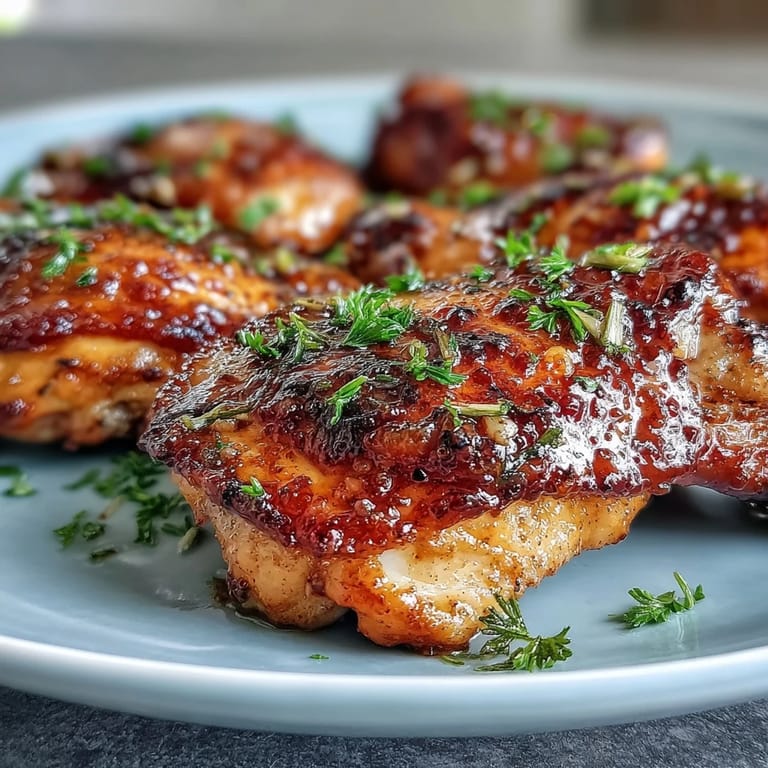
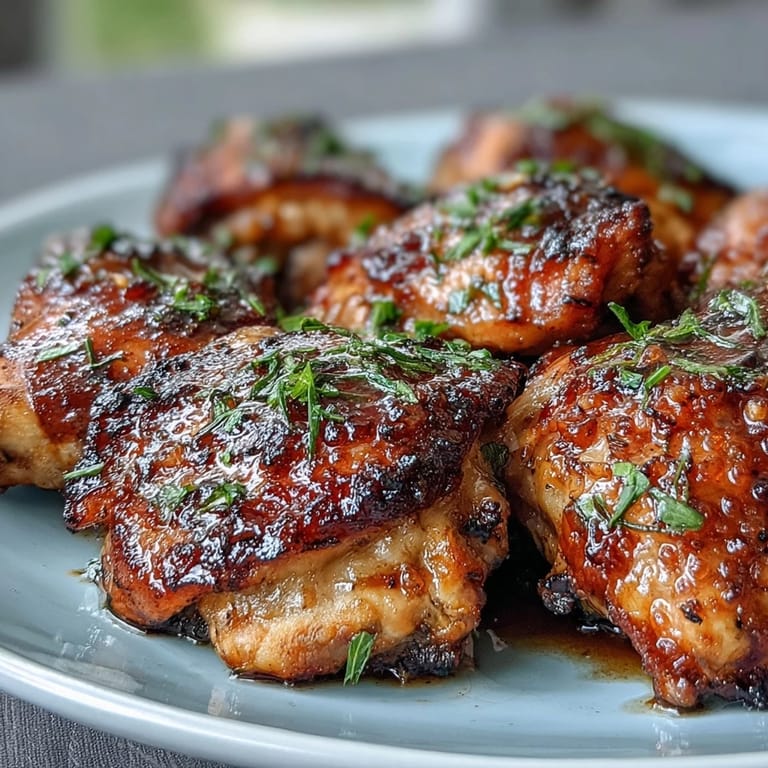
- The chicken is done when the skin is golden brown and the internal temperature hits 175°F, but if you want that extra-crispy finish, blast it under the broiler on high for two to three minutes, keeping your eyes on it because it goes from perfect to charred in seconds. Don't walk away during this step.
- Rest and garnish:
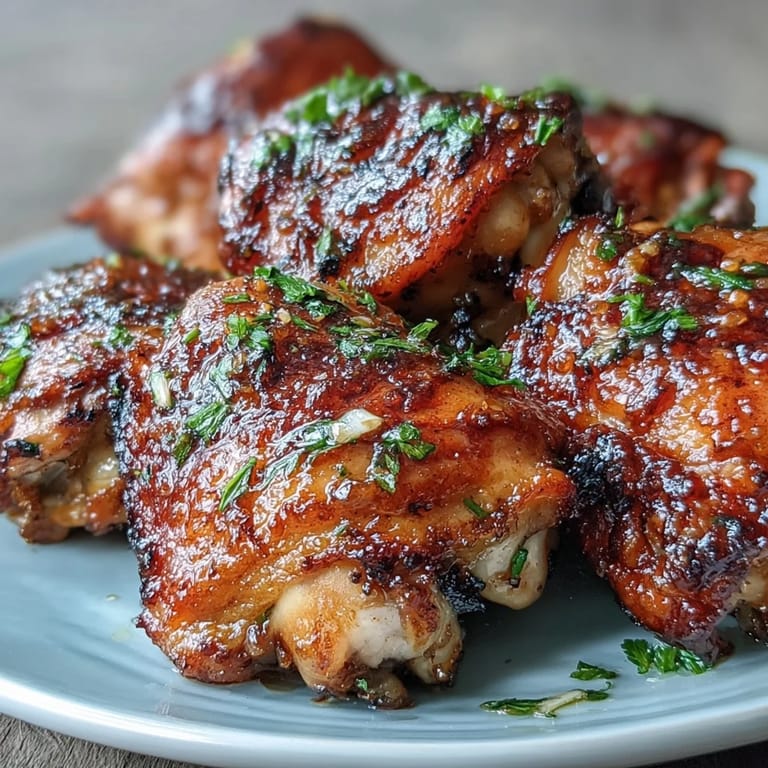
- Let the chicken sit for five minutes out of the oven so the juices redistribute instead of running all over your plate. Scatter fresh parsley and sesame seeds over the top right before serving.
 Save to Pinterest
 I once brought this dish to a potluck where someone's grandmother was tasting it, and she actually closed her eyes while she ate. She told me it reminded her of a dish she'd made for her own family decades ago, which wasn't even the point of the recipe, but it made me realize how food like this creates these unexpected bridges between people. There's something about the combination of sweetness and depth that just works, time and time again.
Timing and Temperature Matters
The first time I made this, I kept opening the oven every five minutes because I was convinced it was going to burn, and that actually made the cooking uneven. I learned that 400°F is hot enough to crisp the skin without drying out the meat underneath, but only if you leave the door closed and trust the process. The basting halfway through is where the real magic happens, because that's when the glaze gets sticky and starts to caramelize instead of just sitting on top.
Serving and Pairing Ideas
Steamed jasmine rice is the classic move because it soaks up all that glossy sauce like a dream, but I've also served it over roasted cauliflower or with a simple arugula salad and it works beautifully. The acid from a salad actually cuts through the richness perfectly, while rice lets you lean into the comfort food aspect. I've even ladled extra sauce from the pan over everything on the plate because there's never too much of this glaze.
Flexibility and Variations
The beauty of this recipe is how willing it is to work with what you've got. I've made it with boneless thighs when that's all I could grab at the store, and while the skin-on version is superior, the boneless version still delivers on juiciness and tastes just as good. Try adding fresh lemon juice right at the end for brightness, or experiment with a splash of rice vinegar if you want a subtly different tang.
- Make it ahead by marinating the chicken in the sauce for up to twelve hours in the fridge, which deepens the flavor and makes your actual cooking day shorter.
- Swap in different proteins like pork chops or salmon if you're tired of chicken, though you might need to adjust cooking time accordingly.
- Double the glaze if you're feeding a crowd or want plenty of sauce to spoon over rice and vegetables.
 Save to Pinterest
 This is the kind of recipe that becomes a regular in your rotation not because it's flashy, but because it's reliable and it makes people happy. Once you make it once, you'll find yourself coming back to it again and again.
Recipe FAQs
- → What temperature should I bake the chicken thighs at?
Preheat your oven to 400°F (200°C) to ensure even cooking and a crispy skin.
- → Can I use boneless chicken thighs instead?
Yes, boneless thighs work well but reduce baking time to 25–30 minutes to avoid drying out.
- → Is there a way to get extra crispy skin?
Broil the chicken for 2–3 minutes at the end of baking to crisp the skin, watching carefully to prevent burning.
- → What can I serve alongside this chicken?
Steamed rice, roasted vegetables, or a crisp salad complement the flavors and textures perfectly.
- → Can this dish be prepared ahead of time?
Marinate the chicken in the sauce for up to 12 hours in the fridge to enhance the flavors and save time on cooking day.