 Save to Pinterest
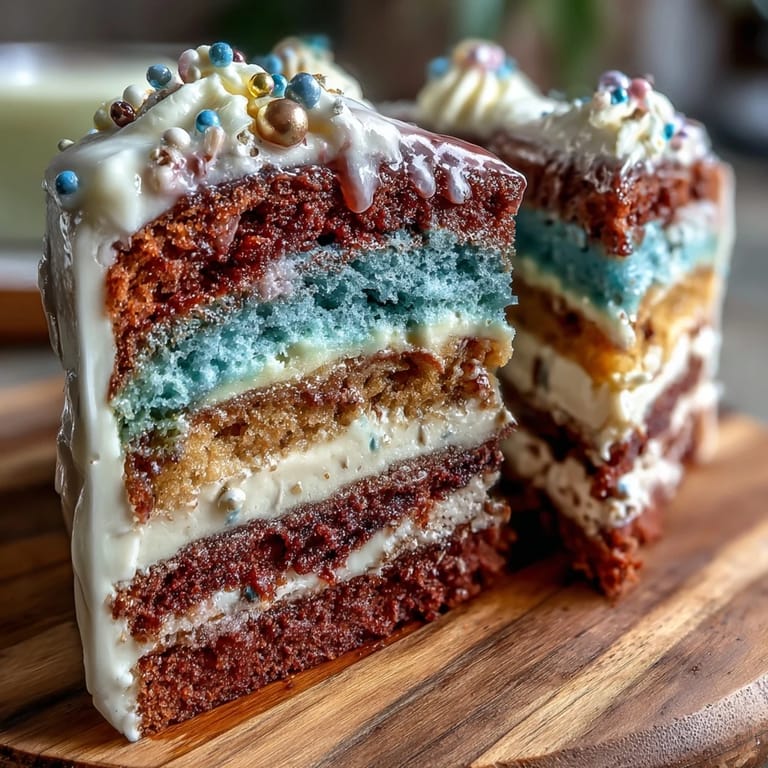
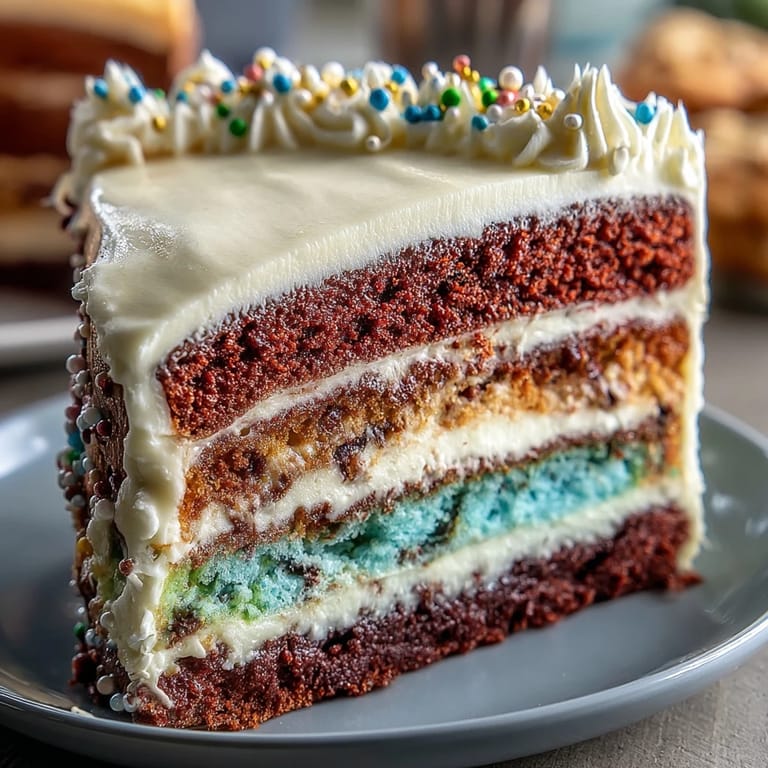
 My hands were shaking a little when I started mixing this cake on my nephew's graduation morning—not from nerves about the baking, but from wanting it to be perfect for him. He'd chosen his school colors for the ombre, and watching that gradient come together in the bowl felt like watching his whole journey materialize in buttercream and cake. There's something magical about making a cake that tells a story in layers.
I watched my sister's eyes get teary when she saw it on the table at the reception—she hadn't expected something so polished from her slightly-chaotic brother in the kitchen. That moment, when the cake became less about technique and more about marking a real milestone, made every careful brush of buttercream worth it. The whole room wanted to take photos before anyone would cut into it.
Ingredients
- All-purpose flour: The foundation of your cake structure; sift it if you have time, but honestly, whisking it thoroughly works just fine and saves a dish.
- Baking powder: This is your lift and lightness—don't skip the measuring spoon on this one.
- Salt: A small amount that makes the vanilla and butter sing without tasting salty at all.
- Unsalted butter: Room temperature is non-negotiable here; cold butter won't cream properly and you'll end up with a dense cake.
- Granulated sugar: This creams with the butter to trap air, which is how your cake becomes tender and fluffy.
- Large eggs: Room temperature eggs blend smoothly into the batter; cold eggs can cause the mixture to break and create a grainy texture.
- Vanilla extract: Use real vanilla, not imitation—it makes a noticeable difference in the final flavor, especially when nothing else is competing for attention.
- Whole milk: Room temperature milk incorporates without shocking the batter and creating pockets of density.
- Gel food coloring: This is the secret to your ombre—gel colors are concentrated, so you use less liquid, which means your batter stays the right consistency and your colors stay true and vibrant.
- Egg whites: For the buttercream; make sure they're completely free of yolk or your meringue won't reach stiff peaks.
- Unsalted butter (for buttercream): This needs to be room temperature and cubed so it incorporates smoothly into the meringue without breaking the emulsion.
Tired of Takeout? 🥡
Get 10 meals you can make faster than delivery arrives. Seriously.
One email. No spam. Unsubscribe anytime.
Instructions
- Set yourself up for success:
- Preheat your oven to 350°F and get those four cake pans ready with parchment paper—no shortcuts here. Having everything prepped and at room temperature before you start is the difference between a smooth bake and frustration.
- Make your dry mix:
- Whisk flour, baking powder, and salt together in a bowl; this distributes the leavening evenly so you don't get dense pockets. Set it aside and don't skip this step.
- Cream your butter and sugar:
- Beat them together until the mixture is pale, fluffy, and looks almost like frosting—this usually takes three to five minutes and means you're trapping the air that makes cake light. If you rush this, your cake will be heavier.
- Add your eggs slowly:
- Add them one at a time, making sure each one is fully incorporated before the next one goes in; this keeps the batter smooth and prevents that broken, grainy look. It feels tedious, but it matters.
- Alternate wet and dry:
- Add the flour mixture and milk in three additions, starting and ending with flour; this prevents overmixing, which would develop gluten and make your cake tough. Mix on low speed just until you don't see streaks of flour anymore.
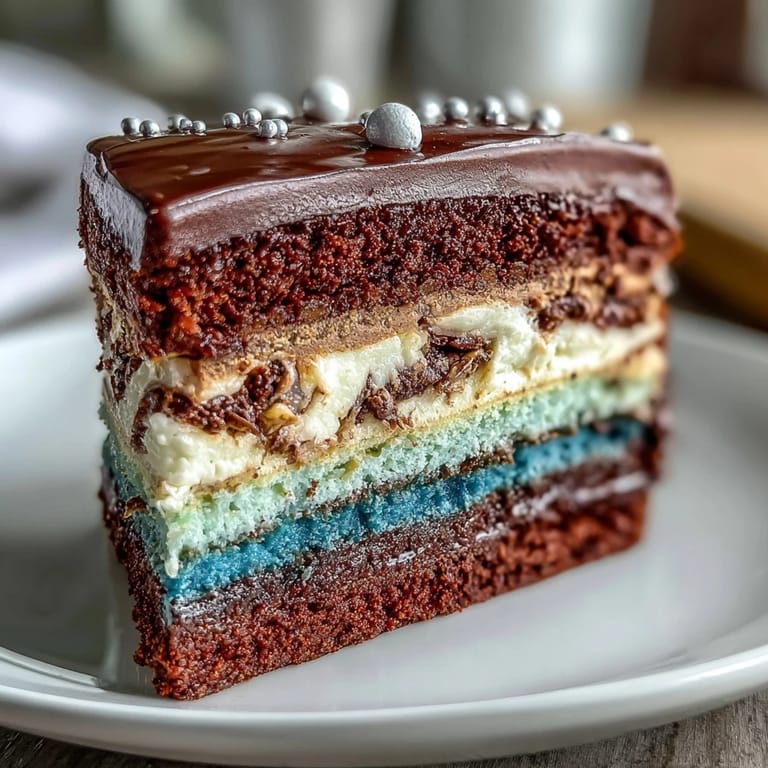
- Create your ombre:
- Divide the batter into four bowls and color them with increasing amounts of gel coloring—start with a drop or two in the lightest layer and add more with each bowl. The gradient in your bowls will bake into the gradient on your cake.
- Bake with confidence:
- Pour each color into its prepared pan and smooth the tops gently. Bake for 22 to 25 minutes; a toothpick should come out clean or with just a few moist crumbs, not wet batter.
- Cool completely:
- Let the cakes rest in their pans for 10 minutes, then turn them out onto racks to cool all the way down—this prevents them from becoming gummy or too fragile to handle. This takes patience, but rushing it will damage your layers.
- Make your Swiss meringue buttercream:
- Combine egg whites and sugar in a heatproof bowl over simmering water and whisk constantly until the sugar dissolves and the mixture reaches 160°F—this pasteurizes the eggs. You'll feel the graininess disappear as you whisk, and you'll know you're done when it feels silky and warm.
- Whip into clouds:
- Transfer to your mixer and whip on high speed until stiff peaks form and the bowl feels cool to the touch—this takes about 10 minutes and transforms a warm liquid into billowing frosting. Don't skip this step; underwhipped buttercream will be greasy.
- Add your butter carefully:
- Add cubed, room-temperature butter a few pieces at a time, mixing well after each addition; if you dump it all in at once, the buttercream will break and look curdled. If it does break, keep mixing—it usually comes back together as you add the rest of the butter.
- Color your frosting:
- If you want an ombre frosting effect, tint portions of the buttercream to match your cake colors; keep some white for blending and smoothing. The white buttercream becomes your secret weapon for creating soft gradients.
- Assemble your masterpiece:
- Place your darkest cake layer on a stand, spread with buttercream, and continue layering from darkest to lightest—this visual progression is what makes the ombre work. Trim any doming off the cake layers with a serrated knife if they're uneven.
- Apply the crumb coat:
- Spread a thin layer of buttercream over the entire cake and chill it for 20 minutes; this seals in crumbs so your final frosting looks clean and polished. This step feels like extra work, but it transforms the finish from homemade-looking to bakery-quality.
- Frost like an artist:
- Apply your final layer of buttercream and blend the colors if you're doing an ombre effect by using an offset spatula in smooth, gentle strokes. Work slowly here—this is where the magic happens.
- Decorate and chill:
- Add edible pearls, a cake topper, or piped details while the buttercream is soft so they stick; then chill until set. Bring to room temperature for 15 to 20 minutes before serving so the cake is tender and the frosting is smooth.
 Save to Pinterest
 After the party, my nephew texted me a photo of himself wearing his graduation cap with a slice of cake, and he said the colors matched perfectly. That's when I realized this cake was never really about impressing people with fancy technique—it was about marking a moment that mattered to someone I love, one beautiful layer at a time.
Why Ombre Cakes Feel Harder Than They Are
The psychology of making an ombre cake is interesting because the concept sounds complicated, but once you understand that you're just dividing one batch of batter and coloring each portion slightly more than the last, it becomes a simple math problem. The bake is the same as any other four-layer cake, and the assembly is just stacking—it's the visual impact that makes people think you've done something extraordinary. The truth is, you have, but not in the way they imagine.
The Swiss Meringue Buttercream Advantage
American buttercream is faster, but Swiss meringue buttercream is worth the extra steps because it's silkier, less likely to feel grainy, and it holds colors beautifully without that chalky look that can happen with powdered sugar buttercream. The egg white component gives it a luxurious texture that feels fancy on the tongue, and because it's less sweet, you can actually taste the butter and vanilla. Once you make it once, you'll understand why bakeries use this method for wedding cakes and celebration cakes.
Timing and Temperature Secrets
The reason this recipe asks for room-temperature ingredients isn't just a technical requirement—it's about allowing everything to blend seamlessly and trap air where it needs to be trapped. Cold butter won't cream properly, cold eggs won't incorporate smoothly, and cold milk will create pockets of separation in your batter that bake into dense spots. One conversation I had with a pastry chef changed how I approached baking: she said, If you're waiting for ingredients to warm up, you're not wasting time—you're building the foundation for success.
- Set eggs and milk out an hour before you start, or place them in a warm water bath for five minutes if you're short on time.
- Cut your butter into cubes before you need it so it softens faster and more evenly than a whole stick.
- Make sure your mixing bowl is dry and grease-free before whipping egg whites, or they'll never reach stiff peaks.
 Save to Pinterest
 This cake celebrates the people and moments that matter, translated into flour and sugar and layers of intentional color. Serve it with champagne or sparkling cider, and watch it become the thing everyone remembers about the day.
Recipe FAQs
- → How do I achieve the ombre effect on the layers?
Divide the batter into separate bowls and tint each with increasing amounts of gel food coloring to create a smooth gradient from light to dark.
- → What is the best way to make Swiss meringue buttercream?
Whisk egg whites and sugar over simmering water until sugar dissolves, then whip until stiff peaks form. Gradually add softened butter and vanilla while mixing.
- → Can I prepare the cake layers in advance?
Yes, bake the layers ahead and store them wrapped in the refrigerator or freezer, ensuring they are well covered to maintain moisture.
- → What decorations complement this layered cake?
Edible gold or silver pearls, themed toppers like caps or diplomas, and piped buttercream details enhance the festive look.
- → Are there tips for intensifying the colors?
Use gel food coloring for vibrant hues and avoid liquid colorings to maintain batter consistency and deeper tones.
- → Is this cake suitable for vegetarians?
Yes, it contains eggs and dairy but no meat products, fitting a vegetarian diet.